The above screen shows the workflow module pipeline after being set by a business team.
The screen on the left side displays different setups being made to achieve the workflow pipeline image on screen, as mentioned below.
- Name Of Set Up Sections of Workflow- TRIGGER, ACTION, CONDITION, FLOW CONTROL. On the right side of the screen, it shows the screen area as mentioned below:
- Name of New Flow- Displays the name of the workflow (e.g., new lead capture)
- Workflow Pipeline Visual Representation Area- shows a visual representation of the workflow structure and components
- Save /Clear Button -Allows the user to save/clear the current workflow.
Navigate the WORKFLOW module on the left bar menu. After clicking, a Screen with different names and, ID of the workflow is displayed.
1. Click on the ADD NEW FLOW button on the screen to add a new name of workflow.

A new pop-up window will appear on screen (below). Add the new name workflow (e.g., New Lead capture)
2. Click on the SAVE button to save the workflow name.

After clicking on save(above), a new screen of the workflow displays as below.

A new screen will display New Lead Capture in the workflow pipeline area. To automate the workflow, click the drop-down menu, click submodule(trigger, action, control, flow control) with different sections( e.g.trigger contains four sections - occurrence of event, in segment, change in user attribute, for specific users).
1. Click on TRIGGERS sub-module, four tabs are visible as shown
OCCURRENCE OF EVENT > IN SEGMENT > CHANGE IN USER ATTRIBUTE > FOR SPECIFIC USER
Select any one at a time(e.g., Occurrence of event).

As soon as the business team selects the occurrence of an event, the same virtual reflection on the workflow virtual area.
2. Click on the OCCURRENCE OF EVENT visual box, and the CONFIGURATION/DELETE option appears on the screen.

3. Click on the CONFIGURATION tab, a new screen, OCCURRENCE OF EVENT, will pop up as shown below.
4. Fill all text fields NAME, TRIGGER, and NEXT STEP (e.g., CONDITIONS > Has done the Event) inside the box.
5. Click on the SAVE Button.

Screen will appear filled with more details(New lead Capture, trigger) in the Occurrence Of Event box as below:

6. Click on the CONDITIONS sub-module from the drop-down menu.

7. Select one or more at a time (e.g., Has done Event). Has Done Event (CONDITIONS ) box (yellow) will appear on the right panel of the screen.
8. Click on the CONFIGURATION button of Has Done Event, and a new pop-up window of Has Done Event will appear on the screen.

9. Fill in all details for name, on yes condition, on no condition, and more conditions can be added by clicking on the button.
10. Click on the save button (below).

11. The “Has Done Event” box contains more details now on the workflow screen.

12. Click on the ACTION sub-module from the drop-down menu. Select one or more at a time (e.g., send WhatsApp). Send WhatsApp box (ACTIONS) (green) will appear pop-up on the right panel of the screen.

13. Click on the CONFIGURATION button of Send WhatsApp, new pop-up window of Send WhatsApp will appear on the screen.
14. Fill in all the details: Name, Leads, User group, and Notify Lead.

15. Click on Compose the message. Users can select and send the template message and schedule as required by setting all details mentioned below.
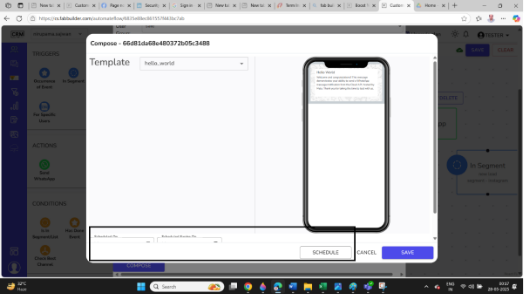
The following shows the setting of the schedule of the message template.

16. Click on the Save button.

Send WhatsApp box contains more details now on the workflow screen(below).

17. Click on the FLOW CONTROL sub-module from the drop-down menu. Select one or more at a time (e.g., wait for some time).
18. Click on the Wait for Some Time, displayed Wait for some time (orange) will pop up on the right panel of the screen.

19. Click on the CONFIGURATION button of Wait for Some Time, and a new pop-up window of Wait for Some Time will appear on the screen.
20. Fill in all details of the name, select the node, and add more.
21. Click on the SAVE button.

Wait for some time box contains more details now on the workflow screen(below).

22. Select the End Journey to complete the workflow automation visual representation when the target is met.

23. Click on the End Journey, displayed End Journey (orange) will pop up on the right panel of the screen.
24. Click on the CONFIGURATION button of End Journey, new pop-up window of End Journey will appear on the screen. Click on the SAVE button of the end journey pop-up window

25. Click on the save button of the workflow virtual representation screen at the top right corner to save the workflow pipeline.
26. Once workflow automation is saved, the user can view the workflow image on the workflow screen immediately after it is created or by clicking the icon or workflow on the blue bar.

27. On clicking VIEW, the following image will appear on the screen.
28. Click on CLONE to copy the flow.

The above image just gives an overview of the visual representation of workflow automation. It can vary as per the business requirements.